


Friday, February 18 2000: Introduction
Page 3 Image Based Rendering:
After 9 Complete months of not playing with Radiance (or rendering at all for that matter), I decided to print out a copy of my last image only to discover that I'd accidentally deleted the output of the 80 hour render from my HD.....
I tried to re-render it, and then discovered that between libc 5 and libc 6 Radiance had broken! Specifically, _quicksort was no longer being found [QUICKFIX: add /usr/lib/libc.a to the text file /usr/lib/libc.so and run ldconfig... this is a hack]
In anycase, this spawned a dialog between me and two of the men behind Radiance; Greg Ward Larson, and Charles Ehrlich. It was pointed out to me that I might consider looking into Paul Debevec's work with Image Based Rendering and Lighting. After seeing his RNL movie, I decided that this was a pursuit that I must follow! over the course of the next month I studied almost every facet of Debevec's site and below is presented a method by which you can get up to speed on this stuff. (As well as my outputs from the venture :)
Sat, Feb 19 2000: Phase 7
Basically the premise goes like this:
A reflective sphere is placed in an environment, and pictures are taken of it at different exposure levels. This allows the very high dynamics of the light in the scene to be accurately captured. (Cameras are incapable of capturing the entire dynamic range in a single photograph.) These images are then combined into a Radiance .PIC format image (which allows REAL values for irradiance instead of pixel color values in an image). This is called a 'Lightprobe'
(If you right click on the image to the left, you can download such an image. More can be found at Paul's Lightprobe page
This lightprobe image can then be turned into a 'source' inside Radiance and allowed to contribute light to the scene. In this manner, you can get a fairly accurate recreation of the lighting environment from the original area mapped into the virtual scene. All that is left, is for you to add your own synthetic objects and voila! Cool things can happen...
March sometime: Phase 8
Ok, so you may be wondering, exactly HOW would one go about setting up a Radiance scene to use these Lightprobe images... which are freely available on his site, and don't even seem to be THAT difficult to make (though I've not tried). Well here you go: First you'll need a mapping function to get the images on the 2D Lightprobe image to a point in 3D Space in the Radience Scene:
This was the hardest part for me to come by, I originally started out with the globe.cal file that was in the Radiance package and basically took a 2D Globe pict and posted it on a sphere... but this didn't work for the long run. Here's what finally did:
EQUATION 1: For any given Dx,Dy,Dz the corresponding (u,v) in the lightprobe is given by (Dx*r,Dy*r), where r=(1/PI)*acos(Dz)/Sqrt(Dx^2+Dy^2)...
Ok so you need a little more than that, I'd guess, so here's an example which shows the mapping and the Material Setup (which is a 'source' with glow parameter): If you set your vp = 0,0,0 vd=0,0,1 and vu=0,1,0.. and -ab [1+] (or IND=[1+])
FILE: angmap.cal
sb_u = 0.5 + Dx * r;
sb_v = 0.5 + Dy * r;

r = 0.159154943*acos(Dz)/Sqrt(Dx*Dx + Dy*Dy);
FILE: example.rad
void colorpict distant_scene
7 red green blue kitchen_probe.hdr angmap.cal sb_u sb_v
0
0

distant_scene glow sky_mat
0
0
4 1 1 1 0

sky_mat source sky
0
0
4 0 1 0 360
Then simply render the image and view:
$ oconv example.rad > example.oct
$
$ rview -vp 0 0 0 -vd 0 0 1 -vu 0 1 0 example.oct
and away you go!
March 9-11 2000: Phase 9
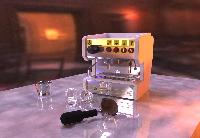
Well after about a month of work on my own, I tried to formulate something similar to the example shown above without outside influences. I had mailed the author asking for more detail but he was currently out of the country giving lectures on this technique. I was able to get some usable results for this technique at just about the same time as he responded to my constant pestering with the example above :) Below are the first outputs that look decent in the context of my now rapidly aging Espresso Theme. Click the Image on the LEFT for an 800x600 version rendered at High Settings with 3 ambient bounces (The background image is a kitchen scene) Click the Image on the RIGHT to get the same *local* objects rendered against the Grace Cathedral Lightprobe with a size of 1600x1164 with 4 ambient bounces. (This one is my favorite to date, but this work is far from done.. (Next stop, Animation)

ONTO NEXT PAGE! Animation


Gallery 1
Click on this icon to look at a Gallery of my Radiance Images (most can be seen here though)
![]()
Gallery
2
Click here to look at a Gallery of my other (NON radiance)
3D/2D Art
![]()
Cryptnet
Click on this icon to return to
Cryptnet (My main Homepage)
![]()
Links
Click on this to see Links to various other
Radiance/3D Resources (including the inspiration for this work
![]()
Download
Click on this Icon for Downloads (models and stuff)
![]()
E-Mail
Click on this icon to send me some e-mail.